Exploring the user interface
Varicent Sales Planning's user interface is split into two views, one for territory planning (Territory) and the other for quota planning (Quota). The user interface is similar for both territory and quota views, with different options available from the battle card and data tray.
When you are done setting up your scenarios and planning your territory and quota, you have the ability to activate a scenario. This creates a new manage version of you planning cycle. Activating a scenario results in a Plan and Manage toggle. This lets you navigate between the Plan version and the Manage version of your planning cycle. The features available in Manage are targeted specifically towards managing your plan during the course of your planning cycle. See, Managing your planning cycle.
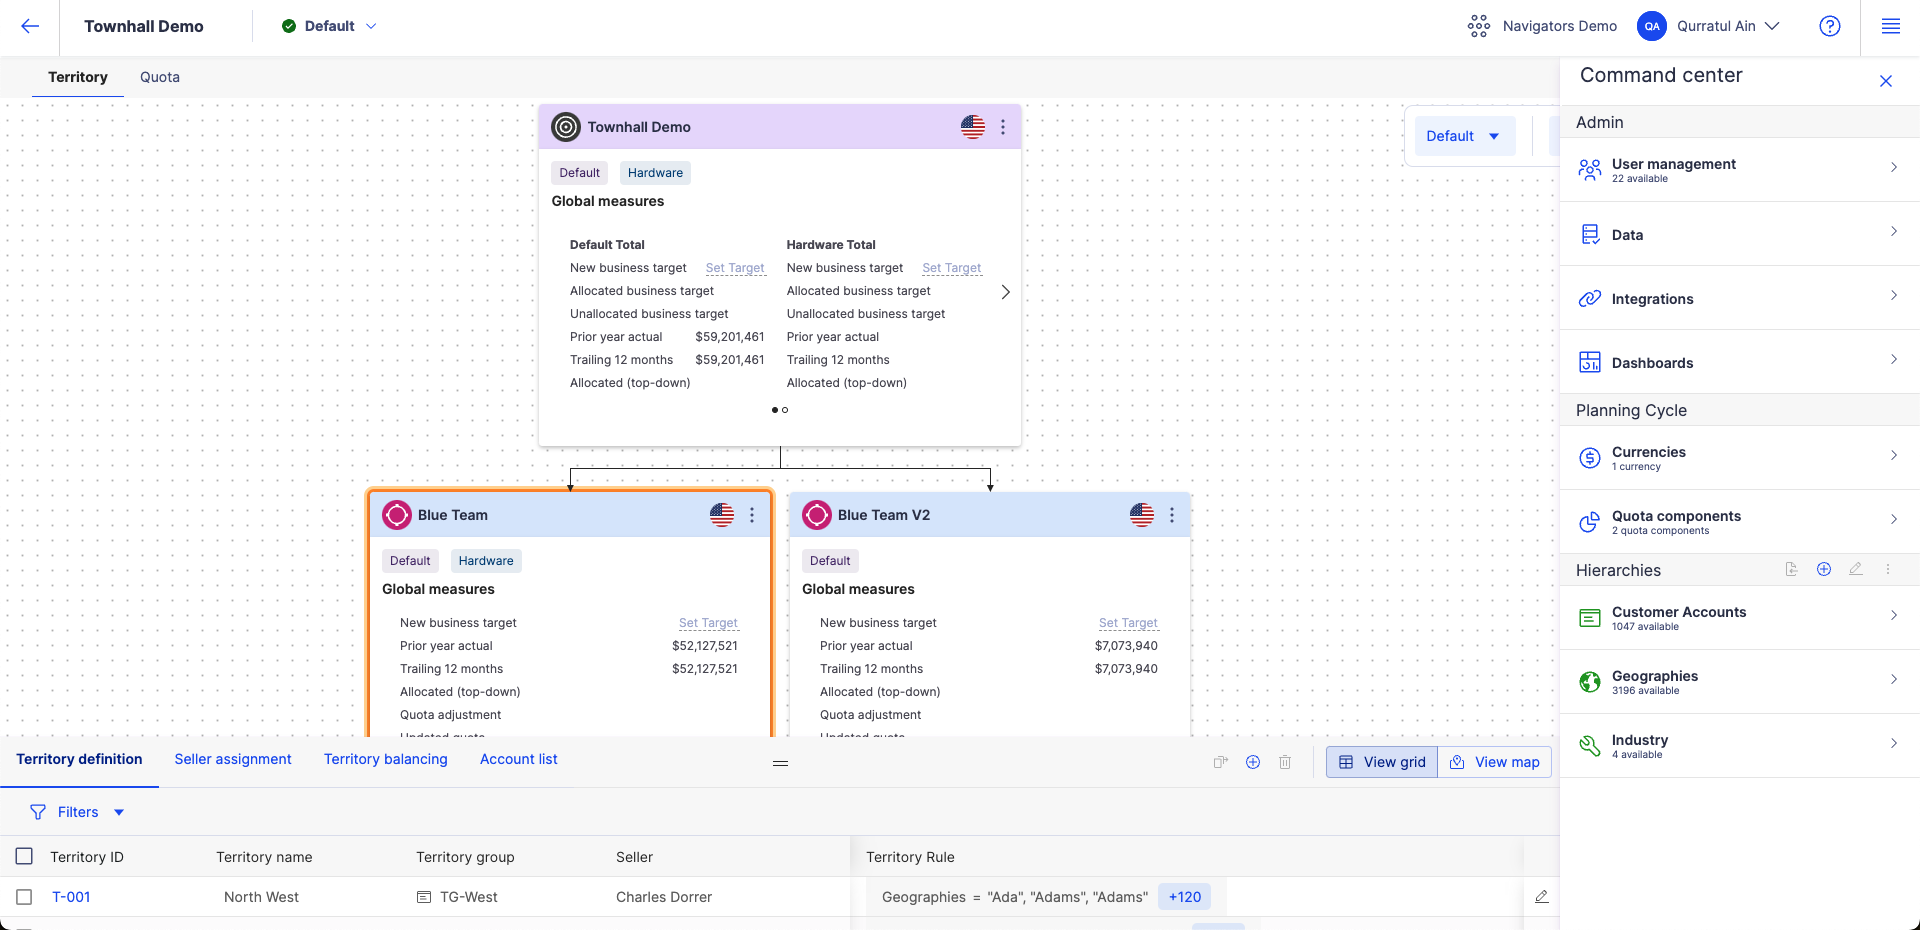
This image shows the user interface in Plan when the Territory view is selected.

Admin panel: from here you can access your scenarios, tenant options (if you have more than one tenant set up for your organization), open the Command center menu, and access user settings, such as your account profile and user documentation.Once a scenario is activated, you can use the Plan and Manage toggle to switch between the Plan and Manage versions of your planning cycle.
Battle card canvas: the battle card canvas is where you build your model. A root battle card appears at the top of the canvas. From here, you can set your organization's business target and add child battle cards for teams in your organization. The toolbar on the canvas provides options to switch between quota components, change the currency, and start workflows. At the top of the canvas, you can switch between the Territory and Quota views to access territory or quota planning features. Depending on the view you've selected, you will have an option on your battle cards to Plan territories or Plan quotas.
Plan territories - this opens the Territory definition page for the battle card. From here, you can add and manage your territory groups and run coin sort to sort sales activities into territories.
Plan quotas - this opens the Plan targets page for the battle card. From here, you can run top-down quota allocation to allocate quota to your territories based on a top-level target and a chosen metric.
Command center: clicking the menu icon
 opens the Command center. From here, you have the option to import data, such as activity, hierarchy, or user data. You can also manage quota components, currencies, and custom fields for your model.
Data tray: when you select a battle card, the data tray opens. The options available from the data tray differ depending on the view you've selected, Territory or Quota.
The following options are available when the Territory view is selected:
Territory definition - this lists all the territories associated with your battle card. From here you can add and edit territories and assign territory owners. You can also open the map view, which shows a visual representation of your territories in a geographical map.
Seller assignments - this lets you assign sellers to your territories and set effective dates for when these seller assignments are effective.
Territory balancing - this lets you see if your territories are balanced, based on a chosen metric. From here, you can view data comparing your territories, and then move accounts or geographic regions between territories to balance them.
Account list - this table in the data tray provides a list of all of your accounts and shows you the territories they're currently included in along with custom attribute columns that are added to your hierarchies.
The following options are available when the Quota view is selected:
Quota sheet - this lists all the territories associated with your battle card and shows sales metrics for those territories. From here you can make quota adjustments and leave comments to explain your changes. You also have the option to add additional quota sheets to track custom fields specific to certain battle cards or quota components.