Import data
The Import data section of the Integrations page provides tools for importing your data into Varicent Sales Planning. You can import data by dragging a file directly into the import wizard, or you can use one of the data connectors to import data from an external application.
Importing data from a file
You can import data from a local CSV or Excel file by dragging it directly into the import wizard.
On the Planning cycles home page, click the planning cycle to open.
Click the Command center icon
 .
.Under the Admin section, click Integrations.
Click the Import data tab.
Drag your local CSV or Excel file into the import wizard or click Choose a file and navigate to the file you want to import.
Click Continue on the toast message to review your data columns.
Review the columns you want to import:
Clear the check box next to a column to exclude it.
Change the column type for your columns. Options are string, number, date, or boolean.
Select the check box under the Obfuscate column to obfuscate data for a column.
Click Import data.
You data is available on the View sources tab.
Importing data from a data connector
You can connect Varicent Sales Planning to a third-party data connector as a source to import data.
Importing data from Excel files
Import your Excel data to Varicent Sales Planning.
On the Planning cycles home page, click the planning cycle to open.
Click the Command center icon
.Under the Admin section, click Integrations.
Click the Import data tab.
In the Data connectors section, click Excel.
Find the Excel file to import and click Open.
The file starts to upload with a progress bar to show how much is remaining to import. After the import is complete, the data is available on the View sources tab.
Importing data from CSV files
Import your CSV data into Varicent Sales Planning.
On the Planning cycles home page, click the planning cycle to open.
Click the Command center icon
.Under the Admin section, click Integrations.
Click the Import data tab.
In the Data connectors section, click CSV.
Find the CSV file to import and click Open.
The file starts to upload with a progress bar to show how much is remaining to import. After the import is complete, the data is available on the View sources tab.
Importing data from Incentives
Important
Currently, this connector is only available to Varicent customer base. For more information, please contact the Varicent Support team.
From the Integrations page, you can import data from Incentives.
Important
Ensure all data is within a date range between 1677-09-2100:12:43.145224193 and 2262-04-11 23:47:16.854775807. Varicent Sales Planningdoesn't support dates outside of the date range. If the dates are outside of the date range, you could see the following behaviour:
The date range will show the wrong dates if you don't drop or obfuscate columns.
The date range will show blank dates if you drop or obfuscate columns.
On the Planning cycles home page, click the planning cycle to open.
Click the Command center icon
.Under the Admin section, click Integrations.
Click the Import data tab.
In the Data connectors section, click Incentives.
Click New connection.
On the Connect to your Model page, enter for the following information:
Field
Description
Connector name
The name of the connection.
API Key
The Varicent Incentive Compensation Management (ICM) API Key.
Model
The model name. Note: The model name is case sensitive.
Domain Name
The domain name that you use, such as
api.cloud.varicent.com.Click Next.
On the Choose data sets page, select the set of data to include. Click Next.
On the Obfuscate data page, select the data sets that you want to conceal. Click Next.
On the Review page, review the data sets that you are importing.
Click Import data.
Your data is available on the View sources tab.
Importing data from Google Sheets
From the Integrations page, you can import data from Google Sheets.
Important
You may encounter an access token error if you have too many connections open or a stale connection. Create a new connection to try again.
On the Planning cycles home page, click the planning cycle to open.
Click the Command center icon
.Under the Admin section, click Integrations.
Click the Import data tab.
In the Data connectors section, click Google Sheets.
Click New connection.
On the Connect to your database page, enter the
Connector name.Click Sign in with Google.
Follow the on screen prompts to sign in to your Google account.
On the Select data page, choose the file from the Directory dropdown field.
Click Next.
On the Choose data sets page, select which data sets that you want to include. If you want to obfuscate any data, select the data sets to obfuscate.
Click Next.
On the Review page, review the data sets that you are importing.
Click Import data.
Your data is available on the View sources tab.
Importing data from Google Ads
From the Integrations page, you can import data from Google Ads.
On the Planning cycles home page, click the planning cycle to open.
Click the Command center icon
.Under the Admin section, click Integrations.
Click the Import data tab.
In the Data connectors, click Google Ads.
Click New connection.
On the Connect to your database page, enter the name of the connection in the Connection name field.
Click Sign in with Google.
Follow the on screen prompts to sign in to your Google account.
Importing data from Google Analytics
From the Integrations page, you can import data from Google Analytics.
On the Planning cycles home page, click the planning cycle to open.
Click the Command center icon
.Under the Admin section, click Integrations.
Click the Import data tab.
In the Data connectors section, click Google Analytics.
Click New connection.
On the Connect to your Database page, enter the name of the connection in the Connection name field.
Click Sign in with Google.
Follow the on screen prompts to sign in to your Google account.
On the Select data page, fill out the following information:
Field
Description
Directory
Select the URL of the directory.
Start date
Select the start date for the date range.
End date
Select the end date for the date range.
Click Next.
On the Choose data sets page, select which sets of data to include. If you want to obfuscate any data, select the data sets to obfuscate.
Click Next.
On the Review page, review the data sets that you are importing.
Click Import data.
Your data is available on the View sources tab.
Importing data from Salesforce
From the Integrations page, you can import data from Salesforce.
On the Planning cycles home page, click the planning cycle to open.
Click the Command center icon
.Under the Admin section, click Integrations.
Click the Import data tab.
In the Data connectors, click Salesforce.
Click New connection.
On the Connect to your Database page, enter the connector name. Click Next.
You are redirected to the Salesforce website.
On the Salesforce website, enter your credentials.
You will be redirected back to Varicent Sales Planning.
On the Select data page, select the directory and the start date. Click Next.
On the Obfuscate data page, select the data sets that you want to conceal. Click Next.
On the Review page, review the data sets that you are importing.
Click Import data.
Your data is available on the View sources tab.
Importing data from PostgreSQL
From the Integrations page, you can import data from PostgreSQL.
On the Planning cycles home page, click the planning cycle to open.
Click the Command center icon
.Under the Admin section, click Integrations.
Click the Import data tab.
In the Data connectors section, click PostgreSQL.
Click New connection.
On the Connect to your Database page, enter the following information:
Field
Description
Connector name
The name of the connection.
Host
The host URL.
Port
The port number.
Database
The PostgreSQL database name.
User name
The PostgreSQL user name.
Password
The PostgreSQL password.
Click Next.
On the Choose data sets page, select the data sets that you want to include. Click Next.
On the Obfuscate data page, select the data sets that you want to conceal. Click Next.
On the Review page, review the data sets that you want to import.
Click Import data.
Your data is available on the View sources tab.
Importing data from MySQL
From the Integrations page, you can import data from MySQL.
On the Planning cycles home page, click the planning cycle to open.
Click the Command center icon
.Under the Admin section, click Integrations.
Click the Import data tab.
In the Data connectors section, click MySQL.
Click New connection.
On the Connect to your Database page, enter the following information to connect:
Field
Description
Connector name
The name of the connection.
Host
The host name for the connection.
Port
The port number.
Database
The database name.
Username
The user name to access the connection
Password
The password to access the connection.
Click Next.
On the Choose data sets page, select the set of data to include. Click Next.
On the Obfuscate data page, select the data sets that you want to conceal. Click Next.
On the Review page, review the data sets that you are importing.
Click Import data.
Your data is available on the View sources tab.
Importing data from SQL Server
From the Integrations page, you can import data from SQL Server.
On the Planning cycles home page, click the planning cycle to open.
Click the Command center icon
.Under the Admin section, click Integrations.
Click the Import data tab.
In the Data connectors section, click SQL Server.
Click New connection.
On the Connect to your Database page, enter the following information:
Field
Description
Connector name
The name of the connection.
Host
The URL of the host.
Port
The port number.
Database
The name of the database.
Username
The SQL Server user name.
Password
The SQL Server password
Click Next.
On the Select data page, choose the file from the Directory drop-down field.
Click Next.
On the Choose data sets page, select which data sets that you want to include. If you want to obfuscate any data, select the data sets to obfuscate.
Click Next.
On the Review page, review the data sets that you are importing.
Click Import data.
Your data is available on the View sources tab.
Importing data from Oracle
From the Integrations page, you can import data from Oracle.
On the Planning cycles home page, click the planning cycle to open.
Click the Command center icon
.Under the Admin section, click Integrations.
Click the Import data tab.
In the Data connectors section, click Oracle.
Click New Connection.
On the Connect to your Database page, enter the following information to connect:
Field
Description
Connector name
The name of the connection.
Host
The host URL.
Port
The port number.
SID
The Oracle system identifier.
Database
The database name.
Username
The user's Oracle user name.
Password
The user's Oracle password.
On the Choose data sets page, select the set of data to include. Click Next.
On the Obfuscate data page, select the data sets that you want to conceal. Click Next.
On the Review page, review the data sets that you are importing.
Click Import data.
Your data is available on the View sources tab.
Importing data from Amazon Redshift
From the Integrations page, you can import data from Amazon Redshift.
On the Planning cycles home page, click the planning cycle to open.
Click the Command center icon
.Under the Admin section, click Integrations.
Click the Import data tab.
In the Data connectors, click Amazon Redshift.
Click New connection.
On the Connect to your Database page, enter the following information:
Field
Description
Connector name
The name of the connection.
Host
The host URL.
Port
The port number.
Database
The Amazon Redshift database name
Username
The Amazon Redshift username.
Password
The Amazon Redshift password.
Click Next.
On the Choose data sets page, select the data sets that you want to include. Click Next.
On the Obfuscate data page, select the data sets that you want to conceal. Click Next.
On the Review page, review the data sets that you want to import.
Click Import data.
Your data is available on the View sources tab.
Importing data from Amazon Aurora
From the Integrations page, you can import data from Amazon Aurora.
On the Planning cycles home page, click the planning cycle to open.
Click the Command center icon
.Under the Admin section, click Integrations.
Click the Import data tab.
In the Data connectors section, click Amazon Aurora.
Click New connection.
On the Connect to your Database page, enter the following information:
Field
Description
Connector name
The name of the connection.
Compatibility mode
The database that your instance of Amazon Aurora is compatible with, such as
MySQLorPostgreSQL.Host
The Amazon Aurora host URL.
Port
The port number.
Database
The name of the database.
Username
The Amazon Aurora user name, such as
admin.Password
The Amazon Aurora password.
Click Next.
On the Choose data sets page, select the sets of data to include. Click Next.
On the Obfuscate data page, select the data sets that you want to conceal. Click Next.
On the Review page, review the data sets that you are importing.
Click Import data.
Your data is available on the View sources tab.
Importing data from Amazon S3
From the Integrations page, you can import data from Amazon S3.
On the Planning cycles home page, click the planning cycle to open.
Click the Command center icon
.Under the Admin section, click Integrations.
Click the Import data tab.
In the Data connectors section, click Amazon S3.
Click New connection.
On the Connect to your Data page, enter the following information to connect:
Field
Description
Connector name
The name of the connection.
Account ID
The ID of the AWS account that you want to use.
Bucket Name
The name of the AWS bucket in your Amazon S3 instance that you connect to.
Click Next.
On the next Connect to your Data page, follow the on-screen steps to set up your account.
Follow the on-screen steps to create a new policy in your AWS account.
Note
The policy body is pre-populated with the information that you had entered in the previous step. Use the copy button to copy the code.
Follow the on-screen steps to create a new role in your AWS account.
Note
The account ID value is based on the environment that you are in.
Create a unique name in the Role Name field.
Click Next.
On the Select data page, click the Directory drop-down menu to select the set of data to include. Click Next.
Note
If you select a
.csvfile, the .CSV Delimiter field appears. Select one of the following delimiters from the drop-down field: comma, semi-colon, pipe, space or tab button.On the Obfuscate data page, select the data sets that you want to conceal. Click Next.
On the Review page, review the data sets that you are importing.
Click Import data.
Your data is available on the View sources tab.
Importing data from Snowflake
From the Integrations page, you can import data from Snowflake.
On the Planning cycles home page, click the planning cycle to open.
Click the Command center icon
.Under the Admin section, click Integrations.
Click the Import data tab.
In the Data connectors section, click Snowflake.
Click New connection.
On the Connect to your Database page, enter the following information to connect:
Field
Description
Connector name
The name of the connection.
Snowflake URL
The URL to connect to Snowflake, such as
https://<variable>.snowflakecomputing.com.Snowflake role
The role in Snowflake, such as
<user>_role.Warehouse
The name of the Snowflake warehouse your data runs out of.
Database name
The name of the Snowflake database.
Username
The Snowflake user name, such as
admin.Password
The Snowflake password.
Click Next.
On the Select data page, in the Directory field, select the directory for the data set. Click Next.
On the Obfuscate data page, select the data sets that you want to conceal. Click Next.
On the Review page, review the data sets that you are importing.
Click Import data.
Your data is available on the View sources tab.
Importing data from HubSpot
From the Integrations page, you can import data from HubSpot.
Note
Ensure that you use your HubSpot superuser account. This superuser account saves HubSpots permissions. Any Varicent Sales Planning user using this account can access HubSpot. The user does not need a personal HubSpot account.
On the Planning cycles home page, click the planning cycle to open.
Click the Command center icon
.Under the Admin section, click Integrations.
Click the Import data tab.
In the Data connectors section, click HubSpot.
If you are not already logged into HubSpot you will be prompted to log in.
Complete these sub-steps if you are not already logged in to HubSpot, otherwise proceed to step 7.
Log in to HubSpot.
Select the account to connect to, and then click Choose Account.
Click Connect App on the app approval page.
Select the HubSpot connection you wish to pull data from.
Select the start date, click Next.
Select the data sets you would like to import, click Next.
Choose the columns you would like to import, select whether you would like to hide of obfuscate the values for the columns. Click Next.
Review the data for import, click Import to complete the import.
Your data is available on the View sources tab.
Importing data from Microsoft Dynamics
From the Integrations page, you can import data from Microsoft Dynamics.
On the Planning cycles home page, click the planning cycle to open.
Click the Command center icon
.Under the Admin section, click Integrations.
Click the Import data tab.
In the Data connectors section, click Dynamics.
Click New connection.
On the Connect to your Data page, enter the following information to connect:
Field
Description
Connector name
The name of the connection.
Your Dynamics URL
The URL of your Microsoft Dynamics account.
Click Next.
If you are not signed in to your Microsoft Dynamics account, Varicent Sales Planning redirects you to the site to sign in.
On the Select data page, select the following information:
Field
Description
Directory
The name of the directory to get the data.
Start date
The start date of the data you are selecting.
Click Next.
On the Obfuscate data page, select the data sets that you want to obfuscate. Click Next.
On the Review page, review the data sets that you want to import.
Click Import data.
Your data is available on the View sources tab.
Importing data from AgentSync
From the Integrations page, you can import data from AgentSync.
On the Planning cycles home page, click the planning cycle to open.
Click the Command center icon
.Under the Admin section, click Integrations.
Click the Import data tab.
In the Data connectors section, click AgentSync.
Click New connection.
On the Connect to your database page, enter the following information:
Field
Description
Connector name
The name of the connection.
API Key
The API key to identify and authenticate to your AgentSync account.
Secret
The API key secret to identify and authenticate to your AgentSync account.
On the Choose your datasets page, select the sets of data to include. Click Next.
On the Obfuscate data page, select the data sets that you want to conceal. Click Next.
On the Review page, review the data sets that you are importing.
Click Import data.
Your data is available on the View sources tab.
Importing data from Workday
From the Integrations page, you can import data from Workday.
On the Planning cycles home page, click the planning cycle to open.
Click the Command center icon
.Under the Admin section, click Integrations.
Click the Import data tab.
In the Data connectors section, click Workday.
Click New connection.
On the Connect to your Database page, enter the following information to connect:
Field
Description
Connector name
The name of the connection.
Domain
The Workday domain name.
Tenant
The Workday tenant.
Username
The user name to access the connection.
Password
The password to access the connection.
Country Code
The country code for the data.
Exclude Inactive Workers
The option to exclude inactive workers.
Exclude Contingent Workers
The option to exclude contingent workers.
On the Choose data sets page, select the set of data to include. Click Next.
On the Obfuscate data page, select the data sets that you want to conceal. Click Next.
On the Review page, review the data sets that you are importing.
Click Import data.
Your data is available on the View sources page.
Importing data from Varicent Sales Planning
Important
Currently, this connector is only available to Varicent customer base. For more information, please contact the Varicent Support team.
It may seem strange to connect to Varicent Sales Planning when you're already in the product, but this connector lets you import files loaded elsewhere in the product so that you can make use of the Integration tools. This way you can build and transform data for all file types in the product.
On the Planning cycles home page, click the planning cycle to open.
Click the Command center icon
.Under the Admin section, click Integrations.
Click the Import data tab.
In the Data connectors section, click Varicent Sales Planning.
Click New connection.
On the Connect to your Database page, enter the following information:
Connector name: The name of the connection.
Connection URL: The endpoint of the environment.
API key: The Varicent Sales Planning API key. See, Generating an API key.
Click Next.
On the Select data page, select the Directory from the dropdown. Click Next.
On the Choose data sets page, select one or more data sets to include. Click Next.
On the Import data page configure the column type and obfuscation. Click Next.
On the Review page, review the data sets that you are importing.
Your data is available on the View sources tab.
Importing data from SFTP
From the Integrations page, you can import data from SFTP.
On the Planning cycles home page, click the planning cycle to open.
Click the Command center icon
.Under the Admin section, click Integrations.
Click the Import data tab.
In the Data connectors section, click SFTP.
Click New connection.
Note
If you already have an established SFTP connection, you will skip to the Select data page to import new data.
On the Connect to your Model page, enter the following information to connect:
Field
Description
Connector name
The name of the connection.
Host
The host name for the connection.
Port
The port number.
Username
The user name to access the connection.
Password
The password to access the connection.
Select to decrypt files with PGP
Select the checkbox to use your PGP encryption key to enforce PGP decryption for the connection.
Note
If you do not have PGP encryption enabled, this option will not appear. This option only shows when there is an existing PGP key.
Click Next.
On the Select data page, choose the file from the Directory drop-down field.
Note
If you choose a
.csvfile, select the CSV Delimiter from the drop-down field.Click Next.
On the Choose data sets page, select which data sets that you want to include.
On the Obfuscate data page, select the data sets that you want to conceal. Click Next.
On the Review page, review the data sets that you want to import.
Note
You can also change the name of the data sets before you import the data. Click the pencil icon
 to edit the text field.
Click Import data.
Your data is available on the View sources tab.
Importing data from the REST API connector
From the Integrations page, you can import data from the REST API connector.
Note
If you are connecting with OAuth client code, you must ensure that you configure your third-party server first.
On the Planning cycles home page, click the planning cycle to open.
Click the Command center icon
.Under the Admin section, click Integrations.
Click the Import data tab.
In the Data connectors section, click REST API.
Click New connection.
On the Connect to your API page, enter the following information to connect:
Field
Description
Connector name
The name of the connection.
Authentication method
The method to use to authenticate with your REST API. Choose one of the following options:
None: There is no authentication method.
Basic: Enter your Username and Password.
API key: Enter the Authentication header, such as
Authorization: Bearer <api-key-value>OAuth client credentials: Enter the Authentication URL, Token type, Key and Secret.
OAuth client code: Enter the Third-party authentication URL, Access token URL, Scope, Client ID and Client secret.
Endpoint URL
The URL for the REST API, which can contain path and query parameters, such as
https://yourwebsite/com/api/v2/tickets.Path to data
A JSONPath formatted string that locates the desired data from the payload returned from the REST API. Learn more. For example, if the REST API returns a payload like this:
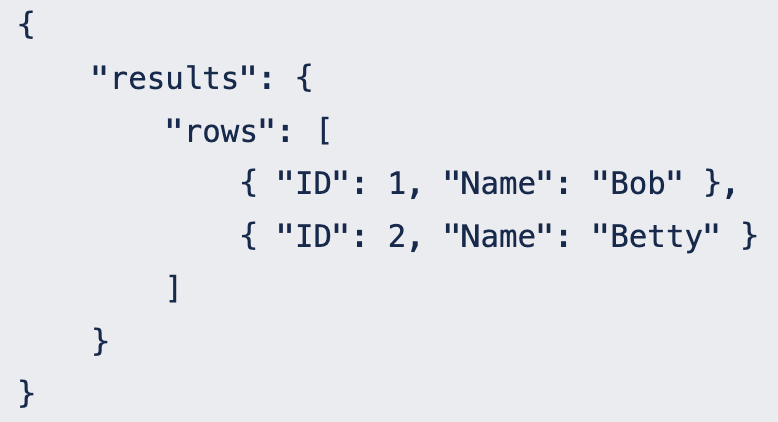
Your Path to data would then look like this:
$.results.rows.Flatten
Select Flatten if each row of data that is being returned from the REST API, at the path that you specified in Path to data, is formatted as a multi-level object, and should be flattened to a single-level object before being processed.
Table key
The name of the identifier or key column in your expected data, such as
ID.Pagination
Select one of the following pagination types:
Paged: Select this option if the REST API supports basic pagination.
First page number: The page number that you want to retrieve first. Pages occurring before this number are not retrieved.
Request page label: The name of the field that specifies the page number in requests to the REST API.
Last page error code: The HTTP error code that is provided in the API response after the last page of data is retrieved.
Offset: Select this option if the REST API supports paging where you can specify the page size.
Page size: The number of entries that you want in each page.
Request page size label: The name of the field that specifies the page size in requests to the REST API.
Path to offset: A JSONPath formatted string that locates the current offset amount from the payload returned from the REST API. Learn more.
Request offset label: The name of the field that specifies the offset in the request to the REST API.
Last page error code: The HTTP error code that is provided in the API response after the last page of data is retrieved.
Cursor: Select this option if your REST API supports cursor-based paging.
Page size: The number of entries that you want in each page.
Request page size label: The name of the field that specifies the page size in requests to the REST API.
Request cursor label: The name of the field that specifies the cursor value in requests to the REST API. Cursor values are taken from the column given in the Table key.
Last page error code: The HTTP error code that is provided in the API response after the last page of data is retrieved.
Click Next.
On the Choose data sets page, select one or more data sets to include. Click Next.
On the Import data page, configure the column type and obfuscation. Click Next.
On the Review page, review the data sets that you are importing.
Your data is available on the View sources page.